iOS TableView Storyboard示例,编辑详情
更新日期 2022-2-24
- 2022-2-24 创建文档
开发环境与工具
- Xcode13
- iOS 14.4
- Swift
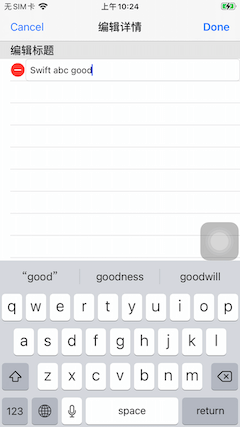
前面我们能够查看数据列表,可以点进去查看某一个数据的详细信息。现在我们来新增一个功能,编辑某一个信息。
我们用一个VC(View Controller)和2个Data Source来实现查看和编辑详情的功能。
本文在显示详情示例基础上进行修改。
数据类
数据类还是SampleEntity.swift不变,详情页就是要把它里面的一些数据展示出来
// SampleEntity.swift
import Foundation

struct SampleEntity {
    var title: String
    var desc: String
    var isComplete: Bool = false
    var updatedDate: Date
}

extension SampleEntity {
    static var testData = [
        SampleEntity(title: "iOS入门开发3", desc: "https://an.rustfisher.com", updatedDate: Date().addingTimeInterval(800.0)),
        // 其他模拟数据...
    ]
}
可编辑的标题
先来编辑标题title,时间updatedDate和描述desc放后面处理。
EditEntityTitleCell
新建EditEntityTitleCell.swift文件,准备用来控制编辑标题的部分
//EditEntityTitleCell.swift
import UIKit

class EditEntityTitleCell: UITableViewCell {
    typealias TitleChanged = (String) -> Void

    @IBOutlet var editTitle: UITextField!

    private var titleChanged: TitleChanged?

    func cfg(titleText: String, changed: @escaping TitleChanged) {
        editTitle.text = titleText
        self.titleChanged = changed
    }
}

extension EditEntityTitleCell: UITextFieldDelegate {
    // 监听文字输入变化
    func textField(_ textField: UITextField, shouldChangeCharactersIn range:NSRange, replacementString string:String) -> Bool {
        if let originText = textField.text {
            let title = (originText as NSString).replacingCharacters(in: range, with: string)
            titleChanged?(title)
        }
        return true
    }
}
typealias TitleChanged用来向外传送标题内容改变的事件UITextFieldDelegate监听用户输入的文字@IBOutlet var editTitle: UITextField!需要连接到storyboard上
从上面我们就得知,需要TextField这个控件来让用户输入文字
storyboard操作
打开我们的TableViewSample1.storyboard,准备操作Sample DetailVC Scene这个界面。
1) 把Table View的Prototype Cells的数量改成2。这个后面做到选择日期的时候还会再改

修改后,界面上prototype会多出一行来。这一行在后面就是section。一个section可以不只有1行。
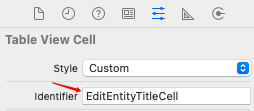
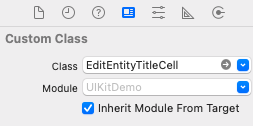
2) 把它的 Identifier 和 Custom Class 都设置为EditEntityTitleCell
3) 在新出现的EditEntityTitleCell里放进一个Text Field,并给它设置好约束条件
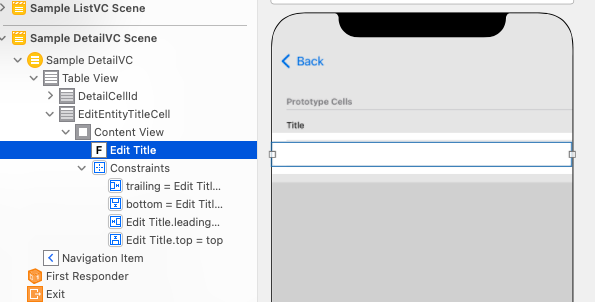
4) 把这个Text Field和EditEntityTitleCell里的@IBOutlet var editTitle连接起来
编辑用的 data source
新建文件SampleDetailEditDS.swift用来处理编辑时的逻辑。DS表示data source。
// SampleDetailEditDS.swift
import UIKit

// 编辑详情
class SampleDetailEditDS: NSObject {
    typealias EntityChangeAction = (SampleEntity) -> Void

    private var entity: SampleEntity // 从外面传进来
    private var entityChangeAction: EntityChangeAction?

    enum EntitySection: Int, CaseIterable {
        case title

        // 编辑时的小标题
        var smallTitle: String {
            switch self {
            case .title:
                return "编辑标题"
            }
        }

        // 给storyboard里判断用
        func cellID(for row: Int) -> String {
            switch self {
            case .title:
                return "EditEntityTitleCell"
            }
        }

        // 要显示多少行
        var numRows: Int {
            switch self {
            case .title: return 1
            }
        }
    }

    init(entity: SampleEntity, changeAction: @escaping EntityChangeAction) {
        self.entity = entity
        self.entityChangeAction = changeAction
    }

    private func dequeueAndCfgCell(for indexPath: IndexPath, from tableView: UITableView) -> UITableViewCell {
        guard let section = EntitySection(rawValue: indexPath.section) else {
            print("出错了")
            fatalError("详情页编辑时出错")
        }
        let sectionId = section.cellID(for: indexPath.row)
        let cell = tableView.dequeueReusableCell(withIdentifier: sectionId, for: indexPath)

        switch section {
        case .title:
            if let titleCell = cell as? EditEntityTitleCell {
                titleCell.cfg(titleText: entity.title) { title in
                    self.entity.title = title
                    self.entityChangeAction?(self.entity)
                }
            }
        }
        return cell
    }
}

extension SampleDetailEditDS: UITableViewDataSource {

    // 拿到cell
    func tableView(_ tableView: UITableView, cellForRowAt indexPath: IndexPath) -> UITableViewCell {
        return dequeueAndCfgCell(for: indexPath, from: tableView)
    }

    // 总共展示多少个section(部分)
    func numberOfSections(in tableView: UITableView) -> Int {
        return EntitySection.allCases.count
    }

    // 每个section有多少行
    func tableView(_ tableView: UITableView, numberOfRowsInSection section: Int) -> Int {
        return EntitySection(rawValue: section)?.numRows ?? 0
    }

    // 展示小标题
    func tableView(_ tableView: UITableView, titleForHeaderInSection section: Int) -> String? {
        return EntitySection(rawValue: section)?.smallTitle ?? ""
    }
}
entity: SampleEntity,这是我们要编辑的主角。
typealias EntityChangeAction负责监听,数据改变后通过它传出去。
enum EntitySection里目前只有一个title,也就是我们目前只修改数据的标题。
看到extension SampleDetailEditDS
用numberOfSections来控制要展示多少个section(部分)。现在只有title这一个部分。
可以用titleForHeaderInSection来展示section的小标题。
SampleDetailVC 改造
修改SampleDetailVC.swift
import UIKit
class SampleDetailVC: UITableViewController {
typealias SampleEntityChangeAction = (SampleEntity) -> Void // 监听保存
var detailEntity: SampleEntity? // 传进来的数据
var tmpDetailEntity: SampleEntity? // 编辑中的数据
private var dataSource: UITableViewDataSource?
private var entityChangeAction: SampleEntityChangeAction?
func cfg(with inputEntity: SampleEntity, entityChangeAction: @escaping SampleEntityChangeAction) {
self.detailEntity = inputEntity
self.entityChangeAction = entityChangeAction
}
override func viewDidLoad() {
super.viewDidLoad()
setEditing(false, animated: false)
navigationItem.setRightBarButton(editButtonItem, animated: false)
tableView.register(UITableViewCell.self, forCellReuseIdentifier: "aa") // 暂时的标记aa
}
override func setEditing(_ editing: Bool, animated: Bool) {
super.setEditing(editing, animated: animated)
guard let detailEntity = detailEntity else {
print("ERROR")
return
}
if editing {
dataSource = SampleDetailEditDS(entity: detailEntity) {
detailEntity in
self.tmpDetailEntity = detailEntity
self.editButtonItem.isEnabled = true
}
navigationItem.title = NSLocalizedString("编辑详情", comment: "标题")
navigationItem.leftBarButtonItem = UIBarButtonItem(barButtonSystemItem: .cancel, target: self, action: #selector(cancelButtonTrigger))
} else {
if let tmpDetailEntity = tmpDetailEntity { // 从编辑那保存回来的
self.detailEntity = tmpDetailEntity
self.tmpDetailEntity = nil
self.entityChangeAction?(tmpDetailEntity) // 通知外面有新保存的
dataSource = SampleDetailViewDataSource(entity: tmpDetailEntity)
} else {
dataSource = SampleDetailViewDataSource(entity: detailEntity)
}
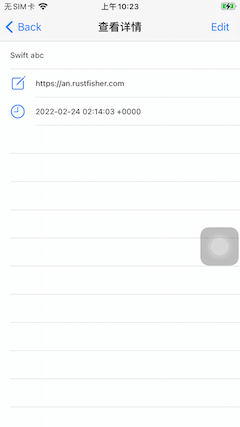
navigationItem.title = NSLocalizedString("查看详情", comment: "标题")
navigationItem.leftBarButtonItem = nil
editButtonItem.isEnabled = true
}
tableView.dataSource = dataSource
tableView.reloadData()
}
@objc // 和前面的#selector对应
func cancelButtonTrigger() {
self.tmpDetailEntity = nil
setEditing(false, animated: true)
}
}
typealias SampleEntityChangeAction是修改保存后的监听
tmpDetailEntity是编辑中的数据
界面加载的时候,setEditing(false, animated: false)设定为不编辑,也就是查看模式
在setEditing方法里,如果是在编辑状态,则使用SampleDetailEditDS
取消编辑的时候cancelButtonTrigger,设置临时数据为空self.tmpDetailEntity = nil,也就是舍弃临时数据回到查看状态
SampleListDataSource
新增一个update方法,用来更新数据。这里的数据还是暂存在testData里。
import UIKit

class SampleListDataSource: NSObject {
    // 更新某一个数据
    func update(_ entity: SampleEntity, at row: Int) {
        SampleEntity.testData[row] = entity
    }
}

extension SampleListDataSource: UITableViewDataSource {
    static let sampleDataCellId = "SampleListCell"

    func tableView(_ tableView: UITableView, numberOfRowsInSection section: Int) -> Int {
        return SampleEntity.testData.count
    }

    func tableView(_ tableView: UITableView, cellForRowAt indexPath: IndexPath) -> UITableViewCell {
        guard let cell = tableView.dequeueReusableCell(withIdentifier: Self.sampleDataCellId, for: indexPath) as? SampleListCell else {
            fatalError("找不到SampleListCell")
        }
        let dataEntity = SampleEntity.testData[indexPath.row]
        cell.cfg(title: dataEntity.title, subtitle: dataEntity.desc, isDone: dataEntity.isComplete,
                 inputDoneBtnAction: {
                    SampleEntity.testData[indexPath.row].isComplete.toggle()
                    tableView.reloadRows(at: [indexPath], with: .none)
        })
        return cell
    }
}
SampleListVC
修改后的数据调用sampleListDataSource?.update进行更新
import UIKit

class SampleListVC: UITableViewController {
    static let showDetailSegueId = "ShowDetailSegueId"

    private var sampleListDataSource: SampleListDataSource? // 持有 dataSource

    override func prepare(for segue: UIStoryboardSegue, sender: Any?) {
        if segue.identifier == Self.showDetailSegueId,
           let destination = segue.destination as? SampleDetailVC,
           let cell = sender as? UITableViewCell,
           let indexPath = tableView.indexPath(for: cell) {
            let entity = SampleEntity.testData[indexPath.row] // 取出数据
            destination.cfg(with: entity) { entity in
                // 详情被修改了 要更新一下列表
                self.sampleListDataSource?.update(entity, at: indexPath.row)
                self.tableView.reloadRows(at: [indexPath], with: .automatic)
            }
        }
    }

    override func viewDidLoad() {
        super.viewDidLoad()
        sampleListDataSource = SampleListDataSource() // 初始化
        tableView.dataSource = sampleListDataSource // 交给tableView
    }
}
reloadRows
现在我们可以修改SampleEntity的title这个变量了。
后面要修改时间和备注,也是用类似的方法。新建cell来控制并把数据传送回去。
使用storyboard与TableView的一个ToDo例子