GPUImage for Android 初探
更新日期:2022-6-1
- 2022-6-1 更新分析
- 2022-5-19 创建文档
简介
GPUImage for Android使用OpenGL ES 2在Android上实现了多种基础滤镜功能。
能对摄像头采集到的实时数据和图片进行滤镜处理。
下载运行
建议把library gradle注释掉最后一句
//apply from: 'https://gist.githubusercontent.com/wasabeef/2f2ae8d97b429e7d967128125dc47854/raw/maven-central-v1.gradle'
运行工程到手机上,选择相机或者相册。然后选择渲染种类,拖动进度条,可以看到效果。
代码结构
工程的功能包括实时预览摄像头和图片处理。下面我们以视频为例看一下代码主要的结构和数据处理。
工程里有sample和library两个模块。我们主要看library。
GPUImageNativeLibrary提供一些native方法,比如转换yuv为RGBA。
对应的yuv-decoder.c在cpp目录里。
GPUImage类提供了大部分的功能接口。它持有GPUImageRenderer、GPUImageFilter,以及GLSurfaceView和GLTextureView。
GPUImageFilter包含OpenGL shader语句,调用了GLES20的方法。
相机预览数据流向
数据流向示意图
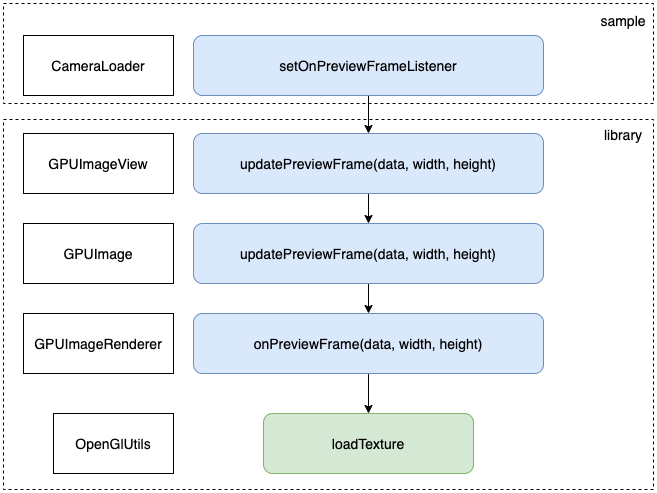
如上图所示,从相机获取到数据,层层传入库中,最后进行渲染OpenGlUtils.loadTexture。
Camera1 采集数据
| Camera1Loader.kt |
|---|
| cameraInstance!!.setPreviewCallback { data, camera ->
if (data == null || camera == null) {
return@setPreviewCallback
}
val size = camera.parameters.previewSize
onPreviewFrame?.invoke(data, size.width, size.height)
}
|
onPreviewFrame是一个回调接口,将摄像头采集到的数据回调出去
Camera2 采集数据
| Camera2Loader.kt |
|---|
| private fun startCaptureSession() {
val size = chooseOptimalSize()
imageReader =
ImageReader.newInstance(size.width, size.height, ImageFormat.YUV_420_888, 2).apply {
setOnImageAvailableListener({ reader ->
val image = reader?.acquireNextImage() ?: return@setOnImageAvailableListener
onPreviewFrame?.invoke(image.generateNV21Data(), image.width, image.height)
image.close()
}, null)
}
try {
cameraInstance?.createCaptureSession(
listOf(imageReader!!.surface),
CaptureStateCallback(),
null
)
} catch (e: CameraAccessException) {
Log.e(TAG, "Failed to start camera session")
}
}
|
通过onPreviewFrame将nv21数据传出去
处理数据
activity中选择合适的cameraLoader。从Camera中获取到的数据,会通过onPreviewFrame传出来,在activity中接收到这些数据。
然后交给gpuImageView去处理。
| CameraActivity.kt |
|---|
| cameraLoader.setOnPreviewFrameListener { data, width, height ->
gpuImageView.updatePreviewFrame(data, width, height)
}
|
GPUImageView中交给GPUImage来处理
| GPUImageView.java |
|---|
| public void updatePreviewFrame(byte[] data, int width, int height) {
gpuImage.updatePreviewFrame(data, width, height);
}
|
GPUImage中交给GPUImageRender来处理
| GPUImage.java |
|---|
| public void updatePreviewFrame(final byte[] data, final int width, final int height) {
renderer.onPreviewFrame(data, width, height);
}
|
GPUImageRenderer中进行处理
| GPUImageRenderer.java |
|---|
| public void onPreviewFrame(final byte[] data, final int width, final int height) {
if (glRgbBuffer == null) {
glRgbBuffer = IntBuffer.allocate(width * height);
}
if (runOnDraw.isEmpty()) {
runOnDraw(new Runnable() { // (1)
@Override
public void run() {
GPUImageNativeLibrary.YUVtoRBGA(data, width, height, glRgbBuffer.array());
glTextureId = OpenGlUtils.loadTexture(glRgbBuffer, width, height, glTextureId);
if (imageWidth != width) {
imageWidth = width;
imageHeight = height;
adjustImageScaling();
}
}
});
}
}
|
- 添加任务
runOnDraw方法把数据包进Runnable,加入任务队列Queue<Runnable> runOnDraw中。
OpenGlUtils先将YUV转换给RBGA,再调用OpenGL的方法绘制
| OpenGlUtils.java |
|---|
| public static int loadTexture(final IntBuffer data, final int width, final int height, final int usedTexId) {
int textures[] = new int[1];
if (usedTexId == NO_TEXTURE) {
GLES20.glGenTextures(1, textures, 0);
GLES20.glBindTexture(GLES20.GL_TEXTURE_2D, textures[0]);
GLES20.glTexParameterf(GLES20.GL_TEXTURE_2D,
GLES20.GL_TEXTURE_MAG_FILTER, GLES20.GL_LINEAR);
GLES20.glTexParameterf(GLES20.GL_TEXTURE_2D,
GLES20.GL_TEXTURE_MIN_FILTER, GLES20.GL_LINEAR);
GLES20.glTexParameterf(GLES20.GL_TEXTURE_2D,
GLES20.GL_TEXTURE_WRAP_S, GLES20.GL_CLAMP_TO_EDGE);
GLES20.glTexParameterf(GLES20.GL_TEXTURE_2D,
GLES20.GL_TEXTURE_WRAP_T, GLES20.GL_CLAMP_TO_EDGE);
GLES20.glTexImage2D(GLES20.GL_TEXTURE_2D, 0, GLES20.GL_RGBA, width, height,
0, GLES20.GL_RGBA, GLES20.GL_UNSIGNED_BYTE, data);
} else {
GLES20.glBindTexture(GLES20.GL_TEXTURE_2D, usedTexId);
GLES20.glTexSubImage2D(GLES20.GL_TEXTURE_2D, 0, 0, 0, width,
height, GLES20.GL_RGBA, GLES20.GL_UNSIGNED_BYTE, data);
textures[0] = usedTexId;
}
return textures[0];
}
|
GPUImageRenderer渲染的时候,将任务从队列runOnDraw中取出再执行
| GPUImageRenderer.java |
|---|
| @Override
public void onDrawFrame(final GL10 gl) {
GLES20.glClear(GLES20.GL_COLOR_BUFFER_BIT | GLES20.GL_DEPTH_BUFFER_BIT);
runAll(runOnDraw);
filter.onDraw(glTextureId, glCubeBuffer, glTextureBuffer);
runAll(runOnDrawEnd);
if (surfaceTexture != null) {
surfaceTexture.updateTexImage();
}
}
|
GLES20 相关
项目中使用了GLES20,这里列举一下使用到的方法。
glViewport
glViewport( GLint x, GLint y, GLsizei width, GLsizei height )
x,y 以像素为单位,指定了窗口的左下角位置。width,height表示视口矩形的宽度和高度,根据窗口的实时变化重绘窗口。
glCreateProgram
创建 GLSL 程序
loadProgram
loadProgram(final String strVSource, final String strFSource)
glLinkProgram
链接 GLSL 程序
glUseProgram
glUseProgram(int program)
使用 GLSL 程序
glVertexAttribPointer
绑定 vertex 坐标值
glEnableVertexAttribArray
启用 vertex
glGetAttribLocation
获取 shader 代码中的变量索引
glAttachShader
attatch shader 代码
glShaderSource 和 glCompileShader
加载 shader 代码
GPUImage工程结构是什么样的?
它是怎么处理数据的?
我们能否拿到OpenGL渲染后的图像数据?
本站说明
一起在知识的海洋里呛水吧。广告内容与本站无关。如果喜欢本站内容,欢迎投喂作者,谢谢支持服务器。如有疑问和建议,欢迎在下方评论~
🖥️云雨服务器
🙋反馈问题
🔥最近更新
🍪投喂作者